Showing posts with label Great Plains. Show all posts

Using keyboard shortcuts in Microsoft Dynamics GP

This article explains how to use the keyboard shortcuts in Microsoft Dynamics GP.
To access a menu using keyboard shortcut keys, press ALT and the underlined letter of the menu that you want to access. For example, press ALT, A to display the Transactions menu and press ALT, F to display the File menu. To select a command from a menu by using the keyboard, press ALT and the underlined letter of the menu that you want to access, then select the underlined letter in the command name. For example, to open the Transaction Entry window, press ALT, A, F, G.
What if two menu commands share the same keyboard shortcut?
If two commands in a menu share a common keyboard shortcut, you can switch between the commands by continuing to press the underlined letter for those commands. For example, if you display the Transactions menu and select Financial, there are four commands that share the same keyboard shortcut (Batches, Bank Deposits, Bank Transactions, and Bank Transfers). To select the Bank Deposits command, press ALT, A, F, B, B. Each time you press B, the next command that has B underlined in its name is selected.

What if a button in an opened window shares the same keyboard shortcut as a menu on the menu bar?

When a button in an open window shares the same keyboard shortcut as a menu on the menu bar, the commands available on that menu will be displayed when you use the keyboard shortcut. But if you type the keyboard shortcut and then press the underlined letter again, the button in the open window will be selected. For example, the Accounts button in the Customer Maintenance window shares the same keyboard shortcut as the Transactions menu on the menu bar. If the Customer Maintenance window is open and you press ALT, A, the commands that are on the Transactions menu will be displayed. But if the Customer Maintenance window is open and you press ALT, A, A, the Accounts button will be selected and the Customer Account Maintenance window will be displayed.

Up-gradation from Microsoft Dynamics GP 10 to Microsoft Dynamics GP2010 / GP 11

First upgrade Microsoft Dynamics GP 10 to Version 10.00.1400 (Hotfix KB 975174 & KB 977783) and then Install Microsoft Dynamics GP2010/GP11 with SP1.  After this run GP2010 Utilities, it will be updated without any error.

Mentor for Microsoft Dynamics GP

If you are an end user you probably already know that one of the most frustrating aspects of working with GP has to be navigating through the menu structure. Granted, improvements to the navigation bar introduced since version 9 have made things a lot easier. Nonetheless, remembering where to find an option that will take you to a specific window can be very challenging at times for both experienced and novice users. Also, what if the window you are trying to access is not a main window? What if you don’t even have security to the window you are trying to access? What if all you know of the window is a portion of the name?

I have to say, I rarely get into blogging about specific ISV solutions, but I had a chance to play around with Mentor by Rockton Software. Mentor answers the questions above and some more about any window, whether in the Dynamics dictionary or any integrating or third party product and is able to provide the exact menu path to follow to access said window.

The Installation Process
I began by downloading Mentor from Rockton Software’s website. After filling out a short registration the download process began. I extracted the downloaded zip file into my Microsoft Dynamics GP installation folder. After launching Dynamics GP, the standard dialog to acknowledge the new code was presented. Mentor is fully enabled for the Fabrikam company.

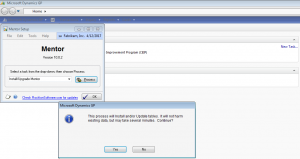
Upon accessing Fabrikam, the Mentor Setup window opened to begin the installation of the database objects. Clicking the Process button triggered the setup process.


After clicking the Yes button in the dialog window the installation process began. In addition to installing the database objects, Mentor collects information about the menu navigation for each window for all products installed on your system.

Using Mentor
Upon completing the installation you will see a new entry on your navigation menu.


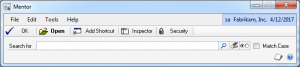
By clicking on this entry you immediately gain access to the main Mentor window.


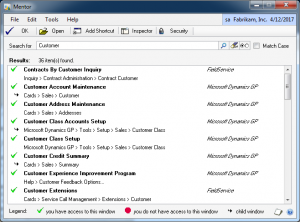
The window is pretty straight forward. I began by testing something pretty obvious. I typed Customer in the search bar. Mentor did exactly what I expected. It searched for all windows that had the word “Customer” in the title, finding 36 items in the process. In addition, Mentor presented all the navigation options for each window and provided visual cues for all windows that can only be opened from a main window.


Mentor is capable of presenting security information for each window displayed, but it also allows you to create shortcuts for these on the navigation bar and provides a quick way to establish the security tasks and roles associated to the window. Mentor is also able to establish whether you have access to a window or not.

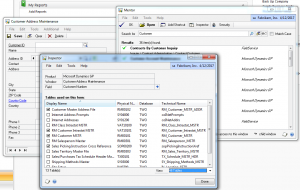
Mentor also offers a sidekick called Inspector, which presents information about each individual field being navigated along with information on the tables associated to the form.


Mentor increases your productivity during the first weeks after going live with Dynamics GP and can even offer valuable information to experienced users. Hat tips to the folks at Rockton Software.

Important Notes for Microsoft Dynamics GP

  • All un posted transactions mostly goes to 10000 series table in every module
  • All un posted transactions mostly detail/line times goes to 10001 tables
  • All posted transactions mostly goes to 20000 series table in every module
  • All posted transactions mostly detail/line times goes to 20001 tables
  • All history transactions mostly goes to 30000 tables
  • 40000 series tables are mostly related to setups
  • Two types of posting setups for every module as follows:
    • Post to General Ledger (Transactions posted from module reside in GL as un posted Batch)
    • Post Through General Ledger (Transactions posted from module also posted in GL)
  • If using transaction posting then every transaction goes to GL as un posted regardless of post TO and Through
  • Cash Receipts Updated AR Module and GL Module but not updated Bank/Checkbook
  • Bank Deposit then update checkbook/bank and have no effect on GL
  • One of the method to call Crystal report in GP is through Dexterity/VBA Code
  • Through Business Portal we can generate and process Purchase Requisition and then converted into GP as Purchase Order, But in GP 10 we can utilize Work Flows to directly create purchase order and to manage hierarchy and approvals without using Business Portal
  • VBA, Modifier, Dexterity and .Net are used for GP Customization
  • FRx is Reporting tool that can be utilized for financial reporting
  • Financial Reporting are namely (Balance Sheet, P&L, Income Statement, Cash Flow, etc)
  • From GP we can use, Smart List, Inquiry and Report for viewing data
  • Two types of posting mostly follows in GP:
    • Transaction Posting (User who enter transaction can immediately post it and it will reside in GL as un posted regardless of posting setup POST TO or POST THROUGH
    • Batch Posting (one users make X No. of transactions in one batch, another user review that batch and then post that batch and in batch posting system take care of POST TO and POST THROUGH
  • Debit memo will increase customer balance in Account receivable (mean we have to take more from customer)
  • Credit Memo will decrease customer balance in Accounts Receivable (mean we have to take less from customer)
  • Credit Memo will decrease supplier/vendor balance in Accounts Payable (Mean we have to pay less to Vendor)
  • No Debit memo available in Accounts Payable
  • National Accounts are utilized in sale/Accounts receivable as Distributor/Retailer or Parent/child relationship

RetrieveGlobals9.dll in Microsoft Dynamics GP

Microsoft has published a dll called RETRIEVEGLOBALS.DLL that can be used to access user data from inside of Dynamics GP.

Database Connections for Modifier with VBA or Integration Manager in Microsoft Dynamics GP

The RetrieveGlobals9.dll is an ActiveX dll that will return the current User ID, the current company logged in to, the current SQL data source as well as the current user date in Microsoft Dynamics GP. The RetrieveGlobals9.dll will also return an ADO connection object that will allow you to connect to Microsoft Dynamics GP Data. The RetrieveGlobals9.dll will work only with version 9.0 Microsoft Dynamics GP and will only work if one session of Microsoft Dynamics GP is running and logged into. The RetrieveGlobals9.dll is only for use in Modifier with VBA or Integration Manager that also require Microsoft Dynamics GP to be open and running.

Installation Instructions
Copy the RetrieveGlobals9.dll to a folder on your machine.
Register the RetrieveGlobals9.dll using regsvr32.exe. Go to Start-Run and enter the path to the regsvr32.exe, followed by the path and name of the DLL. For example:
C:\WINDOWS\system32\regsvr32.exe “c:\GP 90\RetrieveGlobals9.dll
Note: If the DLL registers successfully, you should get a message box indicating so.
Write your application code to call the RetrieveGlobals9.dll


Using the RetrieveGlobals9.dll
The retrieveuserinfo class of RetrieveGlobals9 contains the following properties and functions:

intercompany_id
The intercompany_id method retrieves the Company ID that is currently logged into Microsoft Dynamics GP. This will match with the database name in MSSQL.

Example: “TWO”.

Syntax: intercompany_id () as String

retrieve_user
The retrieve_user method retrieves the User ID that is currently logged into Microsoft Dynamics GP.

Syntax: retrieve_user() as String

sql_datasourcename
The sql_datasourcename method retrieves the current SQL Datasource name that is being utilized by Microsoft Dynamics GP.

Syntax: sql_datasourcename () as String

user_date
The user_date method retrieves the User Date from the Toolbar in Microsoft Dynamics GP.

Syntax: user_date () as Date

status
The status property indicates whether or not a valid connection object can be obtained from the connection property.

Syntax: status As Long

The status property could contain the possible values:

Value Description

0             A Microsoft Dynamics session is not open
1             A connection can be created
2             A connection could not be created
3             The current Microsoft Dynamics session is not Version 9
131072   (&H20000) A COM exception occurred during the connection attempt
262144   (&H40000) The account is locked
65536     (&H10000) The user’s password has expired

connection
The connection property contains an ADODB.Connection to the Microsoft Dynamics GP SQL Server. This connection uses the SQL Datasource, User ID and Password credentials of the user currently logged into Microsoft Dynamics GP. This connection does not have a default database specified.

Syntax: connection As Object

* The connection property will only contain a valid connection object if a Microsoft Dynamics GP 9.0 session is open and running. It should be verified that the status property has a value of 1 prior to attempting to use the connection property.

Example
Dim cn
Dim cmd As ADODB.Command
Dim rst As adodb.Recordset
dim prm as adodb.parameter
Set userinfo = CreateObject("RetrieveGlobals9.retrieveuserinfo")
If userinfo.Status = 1 Then
   Set cn = userinfo.connection
   luserid = userinfo.retrieve_user()
   lintercompanyid = userinfo.intercompany_id()
   lsqldatasourcename = userinfo.sql_datasourcename()
   ldate = userinfo.user_date()
   'Use the connection property to get a connection object.
   Set cn = userinfo.connection
   'set the database to the currently logged in db.
   cn.DefaultDatabase = lintercompanyid
   cmd.CommandType = 4 'stored proc
   cmd.ActiveConnection = cn
   cmd.commantText = "myStoredProc"
   'add params
   cmd.parameters.add cmd.CreateParameter("@paramname",adVarchar,adInput,21,"steve")

   Set rst = cmd.Execute
   while not rst.eof
   'do something
   rst.movenext
   wend
end if

cn.close
set cn = nothing

Extender for Microsoft Dynamics GP

Back in September with the release of service pack 4 for Microsoft Dynamics GP version 10.0, the existing Extender functionality was enhanced allowing users to add data fields, notes, macros, lookups and much more, without writing a single line of code.  You can also develop strong business processes and enrich your reporting power with this powerful functionality.  I know this is old news but as I learn more about the product and its capabilities, I am convinced that it is an easy inexpensive way to Extend Microsoft Dynamics GP’s core functionality without always having to purchase 3rd party products or do custom development work.

Download Link for Extender

Feed Management Systems for Microsoft Dynamics GP

Feed Management Systems solutions automate and integrate all of your feed production functions. We link information between your mill and your suppliers and customers to create a more efficient supply and distribution chain.  You can rest assured that our solutions will be compatible with your existing systems. Comprehensive yet easy to use, our solutions automate and optimize formulation, regulatory compliance, pricing, ordering, labeling, and risk management allowing you to do more with less.
  • Simplify re-orders.
  • Make formula changes in a snap.
  • Retain a customer's complete ingredient history for immediate call-up.
  • Maintain absolute feed integrity.
  • Easily provide precise feed formulas.
  • Stay on top of inventory.
With Feed Management's total solution on your team, your business will operate more profitably, more efficiently, and with greater peace of mind.

Solutions

Brill Formulation, the global industry standard solution for formula creation and optimization enables manufacturers to develop the most cost-effective recipe for a specific formula based on required ingredients and nutrients Feed Mill Manager is only real-time information management solution that integrates data from production, formulation, process manufacturing and accounting into a single system for commercial feed manufacturers.
Feed Mill Manager integrates the feed management and accounting needs of producers with the inventory and accounting needs of mills.
Feed Ration Balancer simplifies the development of custom feeds and supplements for multiple species, at cost-effective prices. This robust software also handles nutrient restrictions based upon NRC specifications for each species.
Feed Tags provides the business logic in a feed management software solution that ensures the highest compliance for labeling . This product is a versatile label generator that evaluates medications in feed formulas for accuracy and automatic compliance with AAFCO/CFIA labeling requirements and inclusion restrictions.
Microsoft Business Solutions automate and help improve financial, customer relationship, and supply chain management. Delivered through a network of Microsoft partners, these integrated, adaptable solutions work like and with familiar Microsoft software to streamline processes across an entire business.
Services Our commitment to you is to provide the highest quality implementation, training, troubleshooting, and other support services day in and day out

By: http://www.feedsys.com

SmartConnect - One Stop Integration for Microsoft Dynamics GP and Microsoft Dynamics CRM

Integration and automation are essential components to every successful ERP system. SmartConnect makes integration and automation simple. No other ERP/CRM combination has a toolset that is as powerful, flexible, extensible and yet easy to use as Microsoft Dynamics GP, Microsoft Dynamics CRM and SmartConnect.
SmartConnect provides a drag and drop user interface for configuring integrations into Microsoft Dynamics GP and Microsoft Dynamics CRM from any data source. SmartConnect is powered by both eConnect and CRM web services and has transformed both from being developer tools, into an easy to use end user toolset. There are complex and expensive tools on the market that do a fraction of what SmartConnect can achieve. Save your time and money and read below to discover why SmartConnect has changed the way GP and CRM are implemented - without a single line of code.
Heard enough, Skip Straight to the SmartConnect Videos

SmartConnect provides a number of critical advantages for your Microsoft GP and/or CRM solution:
  • The easiest and yet most configurable way to integrate data into Microsoft Dynamics GP see example
  • The easiest and yet most configurable way to integrate data into Microsoft Dynamics CRM
  • Remote Push integration from Excel to GP and CRM, via SmartConnect Webservices see example
  • Direct Excel data entry for any record type, with predefined ready to deploy templates for Sales Transactions, Purchase Orders, General Ledger, Accounts Payable and Inventory Transactions. Download Templates Now or Watch GL Demo or Watch PO Entry Demo
  • Real Time, two way integration between Microsoft Dynamics GP and CRM.see example
  • Automation of GP and CRM business processes see example
  • Two way integration with Microsoft Dynamics GP eXtender and eXtender Enterprise from eOne click for more
SmartConnect provides a user front end for eConnect. SmartConnect provides all the functionality partners love about Integration Manager but 50 times faster and much more robust. In addition SmartConnect can link to all GP modules, is as easy to use as SmartLists and can be used to automate your business processes.
SmartConnect for Dynamics CRM provides direct drag drop integration for Microsoft Dynamics CRM as well as between CRM and Microsoft Dynamics GP. SmartConnect for CRM is proving to be the easiest to use, best value and most configurable solution for integrating Dynamics GP and Dynamics CRM.
:
SmartConnect Benefits
  • A single flat fee price of US$4,500 (includes SmartConnect for CRM). Bundled with eXtender Enterprise for $6,950.
  • Drag and drop to create eConnect mappings. Creating transactions in Dynamics GP is as simple as dragging and dropping from the source to the destination. No knowledge of Dynamics GP tables is required.
  • SmartConnect is fast. The reduced time required to create mappings, combined with the speed of eConnect, makes SmartConnect the fastest way to create or update records in Microsoft Dynamics GP and CRM. Hundreds of thousands of records can be generated in minutes.
  • Automate data entry. SmartConnect can be used to automate the creation or update of any GP or CRM record based upon definable business rules.
  • Schedule maps to take advantage of downtime to perform bulk transaction processing without disrupting users.
  • Create intercompany transactions. Records can be created across multiple companies. Purchase orders in one company can be used to create sales orders in another company.
SmartConnect Features
  • Create transactions for all supported eConnect modules
  • Create transactions from SmartList - Use SmartList queries as a data source for SmartConnect. Combined with SmartList Builder, you can create or update records from any data in Microsoft Dynamics GP.
  • Connect to any ODBC-compliant data source - Import records from Excel spreadsheets, legacy databases, POS systems, CRM applications and any database or file that can be accessed via ODBC.
  • Scheduling - Create schedules to automatically run daily, weekly, monthly, once, at system startup and at login.
  • Intercompany Flexibility - Create transactions in more than one company at a time. You can even create transactions on different Dynamics GP installations on separate SQL Servers. (N.B. SC does not support the Microsoft Intercompany module).
  • Rolling columns - Use auto-incrementing values. Values can be a custom sequence or one of the standard sequences from Receivables Management, Payables Management, Sales Order Processing, Purchase Order Processing or Inventory Management.
  • Security - SmartConnect adds user security to eConnect. Users can only create and run maps for the nodes and companies that they are granted access to.
  • XML Import/Export - Export and import setup details via XML to share mappings between companies.
Watch an overview of SmartConnect
View the full SmartConnect Brochure
SmartConnect and eXtender together


By: eOne Solutions

Is your Microsoft Dynamics GP Database to Large?


Company Data Archive (CDA) is a 3rd party tool for Microsoft Dynamics GP by Professional Advantage that provides an easy way to move historical information from your 'live' company to another 'archive' company. Archiving your data will reduce the size of your live company database and improve system performance while posting, running reports, performing file maintenance, and day-to-day use of Dynamics GP. Company Data Archive allows you to enter in a cutoff date for historical data and all transactions on or before that date will be moved to the archive company. The archived transactions will still be available to inquire and report on by simply logging into the archive company as you would any other Dynamics GP company or take advantage of powerful cross company inquiries to view transactions from your live and historical companies at the same time. The archive can also be performed periodically - for example on a quarterly or annual basis. 

CDA will archive data from:
  • General Ledger
  • Bank Reconciliation
  • Receivables Management
  • Payables Management
  • Inventory
  • Purchase Order Processing
  • Sales Order Processing
  • Payroll
Check out the product in this quick demonstration:  http://www.profad.com/files/CDA/Company Data Archive Demonstration.wmv 

Dynamics GP on Windows 7 and Windows Server 2008 R2


With the release of Microsoft Windows 7 and Server 2008 R2 on the horizon (slated for an October 22, 2009) many companies will once again be faced with the decision whether to upgrade or not. You can rest assured that if you are running Dynamics GP 10 on one of the latest service packs (SP3 or SP4) that it will already be compatible with Windows 7 and Server 2008 R2 from the time you install your new operating system. The caveat to this is that Microsoft has no plans to make releases prior to Dynamics GP 10 (versions 9.0 and prior) compatible with the new operating systems.

Please take note, however, that Integration Manager is not yet supported in Windows 7. This could simply mean that Microsoft has not completed testing or that there will be some sort of Hotfix or Service Pack requirement for Integration Manager to be supported.

SmartSort for Dynamics GP

Ever wanted to change the default sort method for a lookup in Dynamics GP? Ever wanted to customize a lookup for a specific user or group of users? And SmartSort is the free utility you’re looking for.

Demonstration

Download for SmartSort

Micorosft Dynamics GP Version Retirement Dates By Microsoft

Microsoft Dynamics GP Version Retirement Date
GP Version 8 Retired (no longer supported by Microsoft)
GP Version 9 10/12/2010
GP Version 10 No Retirement Date Set At This Time


Microsoft usually only supports the two most recent version of Microsoft Dynamics GP. Microsoft will typically support a product for the following 24 months after the release of a subsequent version or service pack.

Keeping current with service packs and version releases provides Clients with the newest patches and newest features. It also ensures that you can get on going support from your local support provider or directly from Microsoft.

Setting up Client Workstations for Microsoft Business Portal, GP

In order to required smoothly running of Business Portal on client workstations, perform following procedures on client workstations for smoothly running of Business Portal:

  • Set browser settings for a workstation
Be sure that the Internet Explorer options for client workstations are set so content is refreshed. Also, Internet Explorer security should be set up so that ActiveX controls are allowed to run on the Business Portal web site. If ActiveX controls are not allowed to run, users won’t be able to use result viewer web parts. Internet Explorer options are set for each user on a single computer as follows:

  1. Start Internet Explorer and open the Internet Options window from Tools > Internet Options.
  2. Click the General tab. Under Browsing history, click Settings.
  3. The Temporary Internet Files and History Settings window is displayed. Be sure the Check for newer versions of stored pages option is not set to Never.
  4. Click OK to close the settings window.
  5. Click the Security tab, highlight Trusted Sites, and click Sites to open the Trusted Sites window and also clear the “Require server verification (https) for all sites in this zone” check box. If you can’t clear the check box, you must change the security settings for the Local Intranet zone instead of adding Business Portal to your Trusted Sites list.
  6. In Add this Web site to the zone, enter the Business Portal URL and click Add.
  7. Click OK to close the Trusted Sites window.
  8. In the Internet Options window, be sure Trusted Sites is still selected and click Custom Level to open the Security Settings window.
  9. In the ActiveX controls and plug-ins section, select Enable for the following settings:
    • Download signed ActiveX controls
    • Initialize and script ActiveX controls not marked as safe for scripting
    • Run ActiveX controls and plug-ins
  10. Click OK an alert message will be displayed, asking if you’re sure that you want to change the security settings for the zone, Click Yes.
  11. Click OK to close the Internet Options window.

  • Pop-up blockers
Pop-up blocker software on client workstations may interfere with some Business Portal pages. It is recommended that configure pop-up blockers to allow pop-ups within the Business Portal URL. If your pop-up blocker doesn’t provide this option, please remove or disable pop-up blocker software on Business Portal client workstations.

  • Install Microsoft Office XP Web Components
In order to export information to Excel from a Business Portal client workstation, Microsoft Office XP Web Components must be installed, regardless of the version of Office you're using. The Office XP Web Components can be downloaded from the Microsoft Download Center.

Four Ways To Manage Your Cash With eBanking in Microsoft Dynamics GP

Looking for ways to increase your cash flow, make sure your money gets there on time, monitor cash balances, and reduce check fraud?  We have many customers looking at these exact issues and finding the suite of eBanking products available to Business Ready Advanced Management customers a perfect fit.

Safe Pay
After each check run, you can send a file to your bank with the correct check number and amount and the file is loaded into its system.  The banks call this process “positive pay”.  When the check is presented for payment, only the amount you sent will be debited from your account.  Any other check showing a different amount will be refused.  Every company needs to use this to prevent check fraud.

EFT for Payables
You pay vendors online via your bank’s wire transfer or ACH system now.  Why not transmit this information directly from Dynamics GP to your bank and take out several steps and opportunities for error?  Set up the NACHA format used by most US banks and you can generate a file to upload to the bank’s web or FTP site right after the check run is done with no process changes for payables staff.  The simple setup involves the file verification and pre-noting the participating vendors to verify the accounts and ABA numbers.

EFT for Receivables
An even better way of managing your cash flow is to receive your cash receipts via ACH.  Set up the required format used by your bank and you can download a file to upload the day’s cash receipts from your customers.  There is some setup involving the file verification and verifying the participating customer’s accounts and ABA numbers.

Electronic Reconcile
You don’t want to spend more time that necessary validating your cash in the bank.  Download daily, weekly, or monthly your cleared checks directly into the Bank Reconciliation window and you will always know the amount of cash available that day.  Use the time spent to click off the cleared checks for more productive analysis.

Microsoft Dynamics GP 10.0 Product Download

You can download the Microsoft Dynamics GP 10.0 CD images in U.S. English or International English. The CD images contain the installation of the Microsoft Dynamics GP business application, and also contain separate installations for customization and integration tools such as the following:

Tool
Location
Extender
Feature option for the standard Microsoft Dynamics GP client installation from CD1
Modifier with Visual Basic for Applications (VBA)
Installed as part of the standard Microsoft Dynamics GP client installation from CD1
Integration Manager
Install from Additional Products on CD2
eConnect Runtime
Install from Additional Products on CD2
Web Services Runtime
Install from Additional Products on CD2
Dexterity
Install from the \Tools\Dex\ folder on CD2
Continuum APIs
Install from \Tools\Continuum\ folder on CD2
Microsoft Dynamics GP SDK
Install from \Tools\SDK\ folder on CD2

The Closer for Microsoft Dynamics GP

Remove the tedious and time consuming process of ticking and tying your ledgers in Dynamics GP.  Completely balance your General Ledger with your Inventory, Sales Order, Accrued Purchases, AR, AR, COGS and Cash Sub-Ledgers. Fully reconciled and balanced subledgers and transaction details enables you to have the ultimate base for reporting and making informed decisions.

Benefits Of The Closer
  • Explains the cause of the problem
  • Suggests corrective actions
  • Ensures GL and Sub-Ledgers tie to the penny
  • Builds trust with Microsoft Dynamics GP information
  • Eliminates manual ticking and tying
  • Reduces month end closing time
  • Eliminates write-offs
  • Ensures financial reports and operational reports agree
  • Reduces audit and compliance risks
  • Identifies problem transactions
By: www.reporting-central.com/closer.htm

Custom Link in Microsoft Dynamics GP

Dynamics GP provides a great feature to tie web page links to specific values in Dynamics GP. For example, when a bank account is selected a link is made available to that bank's website. The link is contextual, meaning that it is tied to the value in the field. In this recipe, we'll look at setting up and using the Custom Link feature.

Before users can benefit from this recipe, an administrator needs to set up the custom links. To set up the links:

  • Select Administration from the Navigation Pane on the left. Then click on Custom Link under the Company heading.
  • Click on New on the bottom left.
  • In the Prompt field select Checkbook. In the Custom Link Labelfield type Website.
  • In the Field Value box click on the lookup button (indicated by a magnifying glass) and select the FIRST BANK checkbook.
  • Type www.firstbank.com into the Internet Address field as the bank's website and then click on Save to save the record.


Congratulations, that's all there is to setting up a custom link.

Now we'll see how to use a custom link by completing the following steps:

  • To demonstrate how the custom link works for users, click onFinancial on the Navigation Pane. Select Bank Deposits from theFinancial Area Page under Transactions.
  • In the Checkbook ID field use the lookup button (indicated by a magnifying glass) to select the checkbook used in the previous setup. Once the checkbook shows in the Checkbook IDfield click on the Checkbook ID label.
  • A field will drop down with two options. One, marked Checkbook Maintenance, leads back to the Checkbook Maintenance window. This is the typical behavior if Custom Links have not been set up:


  • Select the second link, Website, to open up a web browser and navigate to the website set up in the link.

This process associates website links with values in specific fields. This allows contextual drill through to web pages for more information. Custom links can be created for Checkbooks, Credit cards, Currency, Customers, Employees, Exchange Rates, Items, Salespeople, Tracking Numbers, and Vendors providing plenty of options to link to more information on the Internet.

A single site can be made available for all of the choices or multiple choices can be applied to a single value. All field values Selecting the All field values checkbox means that the website entered will be used for all values in this field. For example, if a single currency website is used for all currencies, selecting the All field values checkbox points all currency values to that one website. This option is available for prompts named:

  • Checkbook
  • Credit Card
  • Currency
  • Exchange Rate
  • Tracking Number
  • Multiple values

For Custom Links the Prompt field is the key identifier. There can be multiple prompts for a single value, creating more than one link for a value. For example, a bank might have a website used to check balances and a completely different one for processing ACH transactions. By creating two links, one named Balances and one named ACH, both links can be available for a single checkbook.

Speeding Up Lookups with Advanced Lookups in Microsoft Dynamics GP

Dynamics GP provides a very robust functionality in lookup windows for finding data such as accounts, vendors, customers, items, and more. Various fields can be used for sorting or searching and some additional fields are always provided by default. However, if all of that is not enough, Dynamics GP provides an option for administrators to add additional fields to lookups. This recipe demonstrates how to accomplish that.

Before using Advanced Lookups they need to be set up. Up to four custom lookups can be created for each type in the system. We will do this as follows:

  • Select Administration on the Navigation Pane, and under the Company heading select Advanced Lookups.
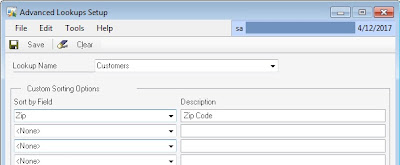
  • On the Advanced Lookups Setup window use the drop-down menu to select a Lookup Name.
  • For our example, select Customers. In the first Sort by Field drop-down menu scroll down and select Zip.
  • Change the Description to Zip Code.
  • Click on Save to save the lookup and close the window.

These setup steps add a lookup based on zip code to any place where Customers are selected in the system:


Once an advanced lookup has been set up, let's look at how to use it by completing the following steps:

Select Sales from the Navigation Pane on the left. Select Customer on the Sales Area Page.
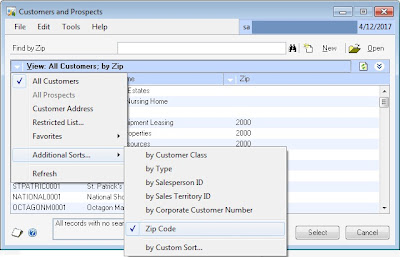
In the Customer ID field click on the lookup button (indicated by a magnifying glass) and click on the arrow next to Additional Sorts. A predefined set of lookups is shown at the top of the drop-down menu and customer lookups are at the bottom. In the middle is the Zip Code lookup created previously.
Click on Zip Code and the Zip codes will appear on the right-hand side of the window. The search box at the top also changes to allow searching by selected lookup. In this case, will be Zip code:


Administrators get the chance to set up four extra lookups for each of the lookup options.  Lookup options include:
  • Accounts
  • Addresses
  • Customers
  • Employees
  • Items
  • Open documents
  • Open Payables documents
  • Prospects
  • Purchase orders
  • Sales Document Numbers
  • Sales documents
  • Vendor addresses
  • Vendors
  • Vouchers
This provides users with more opportunities to ensure that they are selecting the right information with a minimum amount of work.

Improving Financial Reporting Clarity by Splitting Purchasing Accounts in Microsoft Dynamics GP

By default, in Dynamics GP, when a payables invoice is fully or partially paid, the payment portion of the transaction doesn'tfl ow through the payables account. This can make it more difficult to trace a transaction as the transaction could skip the payables account altogether by crediting cash and debiting an expense.

GP provides an optional setting to force transactions tofl ow through the payables account and that's what we'll look at in this recipe.

Setting up GP to pass voucher payments through payables is as easy as following these steps:
Select the Administration button from the Navigation Pane on the left. In the Administration Area Page click on Company under the Setup and Company headers.
Click on the Options button. In the Company Setup Options window scroll down to the
setting marked Separate Payment Distributions and select the checkbox next to it:


Click on OK to close the window and accept the changes.

Let's assume a $100 purchase transaction where $20 is paid in cash and the remaining $80 would go to accounts payable. By default, GP will create a transaction distribution that looks similar to the following screenshot:


After the Separate Payment Distributions checkbox is selected, GP will create a transaction that looks similar to the following screenshot:


Notice that the full $100 is credited to payables and then the $20 payment is debited to reduce accounts payable to the amount due.

Remembering Processes with an Ad hoc Workflow in Microsoft Dynamics GP

Dynamics GP provides options for robust workfl ow functionality integrated with Microsoft Office SharePoint Server(MOSS) or Windows SharePoint Services(WSS). However, for many users this is more functionality than they need. Additionally, many organizations don't feel they are ready for the cost and complexity of MOSS. For users who only need a simple workfl ow to ensure that they remember the steps for a particular task, a basic workfl ow can be built using shortcuts and folders.

This process works well for irregular tasks such as month-end or quarter-end processes where tasks are performed infrequently enough, thus making it easy to forget the steps. For this recipe, we'll look at setting up a basic month-end workflow.

The basic steps of this task are to create a folder to hold the workfl ow and then to add the steps in order to that folder. For our example, we will assume that a month-end financial closing workfl ow includes posting a Quick Journal, processing a Clearing Entry, and closing the month.

Here are the steps to create a basic Ad hoc workflow:
  • Click on the Home button from the Navigation Pane on the left. This makes the Shortcut Bar available on the top left.
  • Right-click on the Shortcut Bar and select Add | Folder to add a folder to the Shortcut Bar that can be used to organize entries. Name the folder Month End and press the Enter key. Now, there is a folder to hold month-end entries.
  • The next step is to add our three sample entries. Select the Month End folder on the Shortcut Bar. Right-click on the folder and select Add | Add Window:


  • Click on the plus sign (+) next to Microsoft Dynamics GP. Click on the plus sign (+) next to Financial and select the window named Quick Journal Entry. Change the name at the top to 1) Quick Journal Entry. Click on Add. Putting a number in front of the text prevents this shortcut from interfering if the same shortcut appears somewhere else on the Shortcut Bar:


  • Next, select Clearing Entry also under Microsoft Dynamics GP and Financial. Rename it to 2) Clearing Entry in the Name field and click on Add.
  • Finally, click on the plus sign (+) next to Company under Microsoft Dynamics GP and select Fiscal Periods Setup. Rename this to 3) Close Period and click on Add. Select Done to finish.
  • These items will now appear on the Shortcut Bar on the left under the Month End folder. Selecting an item with the left mouse button will allow moving of these items around to adjust the order if necessary.


Ad hoc workflows provide an option to group a set of steps together and make these all available in one place. Clicking on the arrow to the left of the folder closes it up and keeps the steps out of the way until these are needed.  Clicking on the arrow again re-opens the folder to run the steps.  Some common uses include creating a basic set of steps for new users, month-end and quarter-end processes, and any other process where it is important to ensure that all of the steps are followed.