Showing posts with label Changer for GP. Show all posts

Database Maintenance Plan for Microsoft Dynamics GP on Microsoft SQL Server 2008

For setting up a database maintenance plan on Microsoft SQL Server 2008, for Microsoft Dynamics GP.

You can set up a weekly maintenance plan for databases in Microsoft Dynamics GP.  However, the frequency that you select depends on the environment and on how much activity occurs within the databases. We recommend that you examine the output for warning signs of possible problems after you set up a maintenance plan.

To set up a database maintenance follow these steps:
  1. Click Start, point to All Programs, point to Microsoft SQL Server 2008, and then click SQL Server Management Studio.
  2. In the Connect to Server window, click SQL Server Authentication in the Authentication list, type the sa user name and password, and then click Connect.
  3. In the Object Explorer area, double-click Management, right-click Maintenance Plans, and then click Maintenance Plan Wizard.
  4. On the Maintenance Plan Wizard starting page, click Next.
  5. In the Select Plan Properties window, type a name for the maintenance plan in the Name field, type a descriptive comment in the Description field, and then select Single schedule for the entire plan or No schedule.
  6. In the Job Schedule Properties window, click the Change button for Schedule, set up a schedule type of "Recurring as Enabled" that has the frequency parameters that meet your maintenance needs, and then click OK.
  7. Click Next to move to the Select Maintenance Tasks window.
  8. In the Select Maintenance Tasks window, click to select the check box for each of the following tasks:
    • Check Database Integrity
    • Reorganize Index
    • Update Statistics
    • Back Up Database (Full)
  9. Click Next.
  10. In the Select Maintenance Task Order window, accept the default order, and then click Next.
  11. In the Databases list, click to select the check box for each Microsoft Dynamics database. To do this, select These databases, click the check box next to each desired database, click OK, and then click Next. Use the default setup for the remaining options.
  12. In the Define Reorganize Index Task window, click to select the check box for each Microsoft Dynamics database. To do this, select These databases, click the check box next to each desired database, click OK, and then click Next. Use the default setup for the remaining options.
  13. In the Define Update Statistics Task window, click to select the check box for each Microsoft Dynamics database. To do this, select These databases, click the check box next to each desired database, click OK, and then click Next. Use the default setup for the remaining options.
  14. In the Define Back Up Database (Full) Task window, click to select the check box for each Microsoft Dynamics database. To do this, select These databases, click the check box next to each desired database, click OK, review the remaining backup parameters, and then click Next.
  15. In the Select Report Options window, accept the default entries, and then click Next.
  16. In the Complete the Wizard window, click Finish. After the maintenance plan is created, click Close.
  17. If you want to configure the maintenance plan to delete backup files that are older than a specific date, follow these steps:
    • In the Object Explorer area, double-click Management, double-click Maintenance Plans, right-click the maintenance plan that you created, and then click Modify.
    • In the Toolbox area at the bottom of the Object Explorer, drag Maintenance Cleanup Task to the right pane.
    • In the right pane, double-click Maintenance Cleanup Task.
    • In the File Location area, click Delete Specific File.
    • In the File name field, type the path of the location where the backup file is located.
      Note If you have backup files for each database and these files are located in separate folders, you must create a Maintenance Plan Cleanup Task for each database folder.
    • To delete full backup files, type BAK in the File Extension field. To delete Transaction Log backup files, type TRN in the File Extension field. To delete both types of files, you must create a Maintenance Plan Cleanup Task for each type of file.
    • In the File Age area, click the appropriate option to set the schedule according to which the files will be deleted, and then click OK.
    • In the right pane, click Back Up Database (Full). A green arrow now appears at the bottom of the window.
    • Drag the green arrow to Maintenance Cleanup Task. A green arrow will connect Back Up Database (Full) to Maintenance Cleanup Task.
    • Click File, and then click Save Selected Item.

Mentor for Microsoft Dynamics GP

If you are an end user you probably already know that one of the most frustrating aspects of working with GP has to be navigating through the menu structure. Granted, improvements to the navigation bar introduced since version 9 have made things a lot easier. Nonetheless, remembering where to find an option that will take you to a specific window can be very challenging at times for both experienced and novice users. Also, what if the window you are trying to access is not a main window? What if you don’t even have security to the window you are trying to access? What if all you know of the window is a portion of the name?

I have to say, I rarely get into blogging about specific ISV solutions, but I had a chance to play around with Mentor by Rockton Software. Mentor answers the questions above and some more about any window, whether in the Dynamics dictionary or any integrating or third party product and is able to provide the exact menu path to follow to access said window.

The Installation Process
I began by downloading Mentor from Rockton Software’s website. After filling out a short registration the download process began. I extracted the downloaded zip file into my Microsoft Dynamics GP installation folder. After launching Dynamics GP, the standard dialog to acknowledge the new code was presented. Mentor is fully enabled for the Fabrikam company.

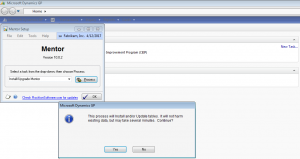
Upon accessing Fabrikam, the Mentor Setup window opened to begin the installation of the database objects. Clicking the Process button triggered the setup process.


After clicking the Yes button in the dialog window the installation process began. In addition to installing the database objects, Mentor collects information about the menu navigation for each window for all products installed on your system.

Using Mentor
Upon completing the installation you will see a new entry on your navigation menu.


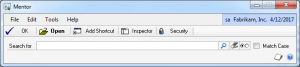
By clicking on this entry you immediately gain access to the main Mentor window.


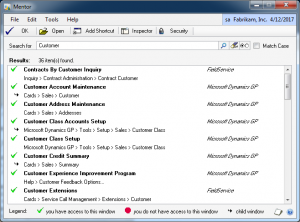
The window is pretty straight forward. I began by testing something pretty obvious. I typed Customer in the search bar. Mentor did exactly what I expected. It searched for all windows that had the word “Customer” in the title, finding 36 items in the process. In addition, Mentor presented all the navigation options for each window and provided visual cues for all windows that can only be opened from a main window.


Mentor is capable of presenting security information for each window displayed, but it also allows you to create shortcuts for these on the navigation bar and provides a quick way to establish the security tasks and roles associated to the window. Mentor is also able to establish whether you have access to a window or not.

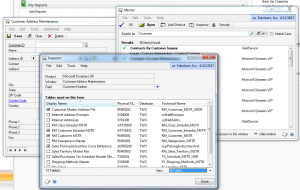
Mentor also offers a sidekick called Inspector, which presents information about each individual field being navigated along with information on the tables associated to the form.


Mentor increases your productivity during the first weeks after going live with Dynamics GP and can even offer valuable information to experienced users. Hat tips to the folks at Rockton Software.

Is your Microsoft Dynamics GP Database to Large?


Company Data Archive (CDA) is a 3rd party tool for Microsoft Dynamics GP by Professional Advantage that provides an easy way to move historical information from your 'live' company to another 'archive' company. Archiving your data will reduce the size of your live company database and improve system performance while posting, running reports, performing file maintenance, and day-to-day use of Dynamics GP. Company Data Archive allows you to enter in a cutoff date for historical data and all transactions on or before that date will be moved to the archive company. The archived transactions will still be available to inquire and report on by simply logging into the archive company as you would any other Dynamics GP company or take advantage of powerful cross company inquiries to view transactions from your live and historical companies at the same time. The archive can also be performed periodically - for example on a quarterly or annual basis. 

CDA will archive data from:
  • General Ledger
  • Bank Reconciliation
  • Receivables Management
  • Payables Management
  • Inventory
  • Purchase Order Processing
  • Sales Order Processing
  • Payroll
Check out the product in this quick demonstration:  http://www.profad.com/files/CDA/Company Data Archive Demonstration.wmv 

Setting up Client Workstations for Microsoft Business Portal, GP

In order to required smoothly running of Business Portal on client workstations, perform following procedures on client workstations for smoothly running of Business Portal:

  • Set browser settings for a workstation
Be sure that the Internet Explorer options for client workstations are set so content is refreshed. Also, Internet Explorer security should be set up so that ActiveX controls are allowed to run on the Business Portal web site. If ActiveX controls are not allowed to run, users won’t be able to use result viewer web parts. Internet Explorer options are set for each user on a single computer as follows:

  1. Start Internet Explorer and open the Internet Options window from Tools > Internet Options.
  2. Click the General tab. Under Browsing history, click Settings.
  3. The Temporary Internet Files and History Settings window is displayed. Be sure the Check for newer versions of stored pages option is not set to Never.
  4. Click OK to close the settings window.
  5. Click the Security tab, highlight Trusted Sites, and click Sites to open the Trusted Sites window and also clear the “Require server verification (https) for all sites in this zone” check box. If you can’t clear the check box, you must change the security settings for the Local Intranet zone instead of adding Business Portal to your Trusted Sites list.
  6. In Add this Web site to the zone, enter the Business Portal URL and click Add.
  7. Click OK to close the Trusted Sites window.
  8. In the Internet Options window, be sure Trusted Sites is still selected and click Custom Level to open the Security Settings window.
  9. In the ActiveX controls and plug-ins section, select Enable for the following settings:
    • Download signed ActiveX controls
    • Initialize and script ActiveX controls not marked as safe for scripting
    • Run ActiveX controls and plug-ins
  10. Click OK an alert message will be displayed, asking if you’re sure that you want to change the security settings for the zone, Click Yes.
  11. Click OK to close the Internet Options window.

  • Pop-up blockers
Pop-up blocker software on client workstations may interfere with some Business Portal pages. It is recommended that configure pop-up blockers to allow pop-ups within the Business Portal URL. If your pop-up blocker doesn’t provide this option, please remove or disable pop-up blocker software on Business Portal client workstations.

  • Install Microsoft Office XP Web Components
In order to export information to Excel from a Business Portal client workstation, Microsoft Office XP Web Components must be installed, regardless of the version of Office you're using. The Office XP Web Components can be downloaded from the Microsoft Download Center.

Activating Horizontal Scroll Arrows for all users in Microsoft Dynamics GP

Horizontal Scroll Arrows are activated by the user. However, an administrator can turn this feature on for all users in all companies by running the following SQL script against the Dynamics database:

UpDate SY01400 Set HSCRLARW=1

Speeding Up Account Entry with Account Aliases in Microsoft Dynamics GP

As organizations grow the chart of accounts tends to grow larger and more complex as well.   Companies want to segment their business by departments, locations, or divisions. All of this means that more and more accounts get added to the chart. As the chart of accounts grows it gets more difficult to select the right account. Dynamics GP provides the Account Alias feature as a way to quickly select the right account. The account aliases provide a way to create shortcuts to specific accounts. This can dramatically speed up the process of selecting the correct account. We'll look at how this works in this recipe.

Getting ready
Setting up Account Aliases requires a user with access to the Account Maintenance Window.

To get to this window:
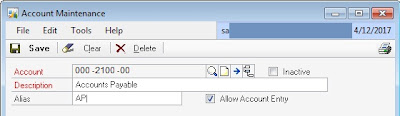
  • Select Financial from the Navigation Pane on the left. In the Cards section of the Financial Area Page click on Accounts. This will open the Account Maintenance window.
  • Click on the lookup button (indicated by a magnifying glass) next to the Account field.
  • Find and select Account No.000-2100-00.
  • Enter AP in the Alias field, which is in the middle of the Account Maintenance window. This associates the letters AP with the Accounts Payable account selected.
  • This means that the user now only has to enter AP instead of the full account number
  • to use the Accounts Payable account:

  • Once aliases have been set up, let's see how the user can quickly select an account using the alias


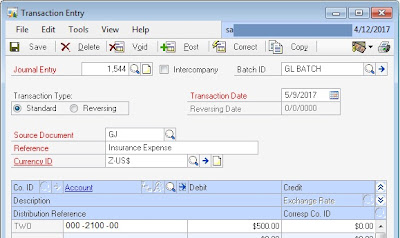
  • To demonstrate how this works, click on Financial from the Navigation Pane on the left. Select Transaction Entry from the Financial Area Page under Transactions.
  • In the Transaction Entry window select the top line in the grid area on the lower half of the window.
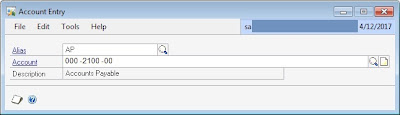
  • Click on the blue arrow next to the Account heading to open the Account Entry window.
  • In the Alias field type AP and press Enter:

The Account Entry window will close and the account represented by the alias will appear in the Transaction Entry window:


Account Aliases provide quick shortcuts for account entry. Keeping them short and obvious makes them easy to use. Aliases are less useful if users have to think about them. Limiting them to the most commonly used accounts make these more useful. Most users don't mind occasionally looking up the odd account. However, they wouldn't want to memorize long account strings for regularly used account numbers.

It's counter-productive to put an alias on every account as that would make finding the right alias as difficult as finding the right account number. The setup process should be performed on the most commonly used accounts to provide easy access.

How To Remove/Avoid "Microsoft_Dynamics_GP.vba project reference" Message Box in Microsoft Dynamics GP

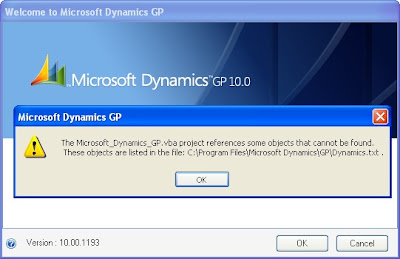
If you are getting "Microsoft_Dynamics_GP.vba project reference" Message Box at start-up then do the followings to ignore this.


Create DEXVBA.ini file, this file is not created by default. You will need to open Notepad (or similar text editor) and create it. The file should be created in the root Windows folder, not in the GP folder.

Step 1. Create a file named DEXVBA.ini in the root Windows folder.
Step 2. Add the following line to the top of the file: [General]
Step 3. Add the selected .ini setting beneath [General].

LogObjects=TRUE
This will create a text file that will include all of the objects in a VBA project. The text file will be the same name as the product dictionary with a ‘.txt’ extension.

NoUnresolvedDialog=TRUE
This will suppress the following error message when you launch Dynamics GP.
“The product_name.vba project references some objects that cannot be found.
These objects are listed in the file: C:\Program Files\Microsoft Business Solutions\GP\ product_name.txt”
The warning will be suppressed for all VBA projects loaded. It doesn’t solve the problem regarding missing objects, but it suppresses the message.

Contents of DEXVBA.ini

[General]
LogObjects=TRUE
NoUnresolvedDialog=TRUE

Deleting Parts, Customers, or Vendors? Microsoft Dynamics GP

Unless you take care to purge all of the sales and purchasing history for inventory items, customers, and vendors, reusing an ID will cause the new item, customer, or vendor to pick up the history of the original item.  Imagine a new customer's surprise when your AR clerk calls them and discusses all of their old bad credit history!

Be safe. Always use new IDs for new customers, new vendors, and new inventory items!

Changer for Dynamics GP

Changer for Great Plains changes GL account numbers, RM customer numbers, PM vendor IDs, IV item numbers and Payroll employee IDs. Changer is comprised of distinct components that deal with each series separately (GL/RM/PM/IV/Payroll). Use Changer to change or combine General Ledger Accounts, Vendor Numbers, Item Numbers and Customer Numbers for all current and historical transactions. In addition, Changer can transfer Employee ID with all current and historical transactions to new Employee IDs.
Changer provides you with a tool to change/merge account numbers and allows for multiple accounts to be consolidated into a single account. All associated transactions and summary details from the old accounts “are transferred” to the “new account”.

GL Accounts (General Ledger) - The GL Changer allows you to globally change or consolidate one or more GL account numbers (and all associated transactions). Changer also allows you to transfer the transactions of one account to another account only after a specified date.

RM Customer (Receivable Management) - The RM Changer allows you to globally change customer identification numbers and all associated transactions into an existing or new single customer.
PM Vendor (Payables Management) - The PM Changer allows you to globally change or consolidate vendor identification numbers and all associated transactions.
IV Items (Inventory) - The IV Changer allows you to globally change or consolidate item numbers and all associated transactions.
Payroll Employee (US Payroll/Canadian Payroll) - The Payroll Changer allows you to globally change employee IDs and all associated transactions.


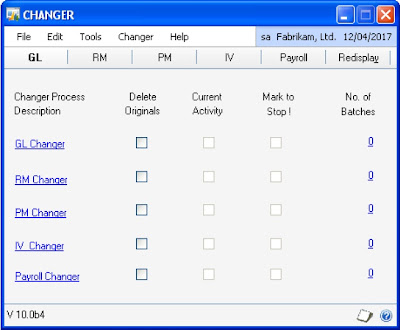
1. GL, RM, PM, IV, Payroll buttons
These buttons initiate the respective Changer processes, which perform the changes. GL will process the change requests for GL accounts while RM, PM, IV and Payroll will process the change requests for customers, vendors, items and employees respectively. Changer change requests should be set up prior to processing using the maintenance windows which can be accessed using the respective links in blue.
2. Changer Process Description
In this column, the five main components of Changer are listed: GL Changer, RM Changer, PM Changer, IV Changer and Payroll Changer. Each row has four status columns. They provide information on whether the component is processing, whether the process has been marked to stop, how many batches have been assigned, and whether the accounts should be deleted after the Changer process.  In order to set up change requests, you need to activate the corresponding [GL/RM/PM/IV/Payroll] Changer Maintenance Window. To do this, position the cursor on the text describing the relevant Changer Process Descriptions (e.g. RM Changer). When the cursor is positioned over the text RM Changer, it changes its shape from an arrow to a pointing hand.  Clicking on the mouse when the cursor is in the shape of a pointing hand will open the RM Changer Maintenance Window or the GL/PM/IV/Payroll Changer Maintenance window depending on which button is selected.
3. Delete Originals
This column provides the functionality to delete all the original accounts once they have been changed for any or all of the modules. Once the change requests are processed with this function, it is not possible to reverse it.
4. Current Activity
This column indicates whether a Changer component is currently processing.  If an ‘X’ is marked in any of the boxes in this column, the corresponding Changer component is currently processing. Changer components can only be processed one at a time.
5. Mark to Stop
An ‘X’ marked in any of the boxes in this column indicates that the corresponding Changer process has been marked to be halted upon completion of the current batch. This can be accomplished by checking ‘Mark to Stop’ checkbox for the appropriate Changer component.
6. No. of Batches
This column indicates how many batches are ready for processing in each of the Changer components.
7. Redisplay
Selecting redisplay refreshes the contents of the window to display the current Changer activity status.

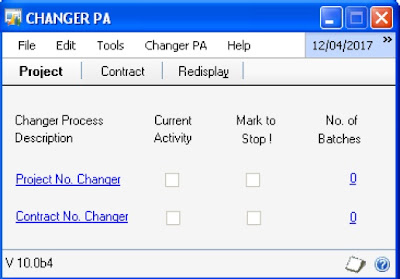
Changer PA Main Window Controls


1. Project, Contract
These buttons initiate the respective Changer processes, which perform the changes. Project button will process the change requests for Project Numbers while Contract button will process the change requests for
Contract Numbers..
2. Changer Process Description
In this column, the main components of Changer are listed: Project No.  Changer and Contract No. Changer. Each row has three status columns. They provide information on whether the component is processing, whether the process has been marked to stop as well as how many batches have been assigned.  In order to set up change requests, you need to activate the corresponding [Project/Contract] Changer Maintenance Window. To do this, position the cursor on the text describing the relevant Changer Process Descriptions (e.g. Project No. Changer). When the cursor is positioned over the, it changes its shape from an arrow to a pointing hand. Clicking on the mouse when the cursor is in the shape of a pointing hand will open the Changer Maintenance window.
3. Current Activity
This column indicates whether a Changer component is currently processing.  If an ‘X’ is marked in any of the boxes in this column, the corresponding Changer component is currently processing. Changer components should only be processed one at a time.
4. Mark to Stop
An ‘X’ marked in any of the boxes in this column indicates that the corresponding Changer process has been marked to be halted upon completion of the current batch.
5. No. of Batches
This column indicates how many batches are ready for processing in each of the Changer components.
6. Redisplay
Selecting Redisplay refreshes the contents of the window to display the current Changer activity status.

By: Renaissance Group