Account Rollups in Microsoft Dynamics GP

Microsoft Dynamics GP provides great functionality for analyzing and reviewing individual accounts and sequential groups of accounts. Many users don't know that it also provides impressive functionality for analyzing non-sequential groups of accounts via a feature known as Account Rollup.

Account Rollups are inquiries built to allow users to see different GP accounts rolled up together and to provide drill back capability to the details. Additionally, these queries can include calculations for things such as budget versus actual comparisons and calculations.

FRx Reporter provides similar functionality and Account Rollup allows users to access this functionality without the wait time of starting up FRx. Let's see how to mix up some account rollups in this recipe.

Before using Account Rollups it's important to understand how to set them up.

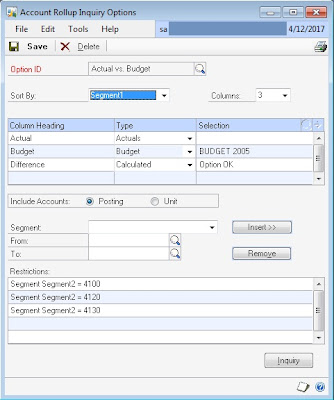
  • To set up Account Rollups, select Financial from the Navigation Pane. Then select Account Rollup in the Inquiry section to open the Account Rollup Inquiry Options window.
  • In the Option ID field enter the name Actual vs. Budget and press Tab. Select Yes to add the option. On the right, set the number of columns to 3.
  • In the first row type Actual in the Column Heading field and set the Type to Actuals.
  • In the second row type Budget in the Column Heading field and set the Type to Budget. In the Selection column click on the lookup button (indicated by a magnifying glass) and select BUDGET 2008.
  • In the third row type Difference in the Column Heading field. Set the Type to Calculated. Click on the blue arrow next to Selection to open up the Account Rollup
  • Inquiry Calculated Column window.
  • In the Column field select Actual and click on the double arrow (>>). Then click on
  • the minus (-) button. Back in the Column field select Budget and click on the double arrow (>>). Click on OK.
  • Back on the Account Rollup Inquiry Options window, select the Segment field, and then select Segment2. Use the lookup buttons (indicated by a magnifying glass) in the From and To fields to add account 4130 and click on Insert. Repeat this process to insert 4120 and then 4100 into the Restrictions box below. Click on Save and close the window:

  • Selecting a line and clicking on Balance from the Account Rollup Detail Inquiry Zoom window drills back to the detailed transactions behind the balance.

Account Rollups combine the account totals from disparate accounts for reporting. This is great for tying back multiple accounts that roll up into a single line on the financial statements. Account Rollups also work well for analyzing a single segment, such as a department, across multiple accounts. In the past, I've used this for easy comparisons of Fixed Asset general ledger accounts to the subledger and for rolling up full-time equivalent of unit accounts to get the number of employees across the company with drill back to the employees in each department.

Internet User Defined fields in Microsoft Dynamics GP

Dynamics GP provides a built-in set of Internet fields for users to enter information such as web pages, e-mail addresses, and FTP sites. What many people don't know is that these are actually user defined fields and can be changed by an administrator. This allows afi rm to add a second e-mail address or remove the FTP link if they want to. In this recipe, we'll look at how to customize these fields.

It is important to keep in mind when setting up Internet User Defined fields that these settings affect all of the Internet User Defined field names attached to address IDs assigned to a Company, Customers, Employees, Items, Salespeople, and Vendors.

Customizing the Internet User Defined fields is easy. Let's look at how it is done. For our example, we'll add the social networking service Twitter as a new label:

  • Select Administration from the Navigation Pane. Under the Setup and Company headers in the Administration Area Page select Company.
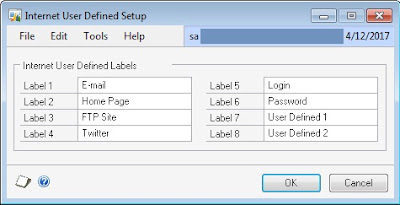
  • Click on the Internet User Defined button and change the description in the Label 4 field to Twitter. Click on OK:


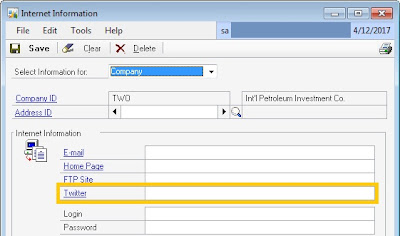
  • Back on the Company Setup screen click on the blue italic letter (I) to the right of the Address ID to open the Internet Information window. In the Twitter field type http://www.twitter.com/user1.
  • Click on the link associated with the Twitter field on the left. This opens a web browser and navigates to my Twitter account so that you can follow me. Click on Save to update the record:


The secret to Internet User Defined fields is how the data is entered. Internet items use a prefix in the field to identify the type of Internet transaction to be used with the link. http:// is used for web pages, mailto:// for e-mail, and ftp:// for FTP sites. These prefixes tell Dynamics GP what to do when a link is clicked on. If no prefix is entered, GP will try to figure out what to do and may or may not succeed.

If http://www.microsoft.com is entered in the Home Page field, clicking on the link to the left will start the default browser and open the Microsoft web page. If http:// is not included but www is, GP figures out that it should open a web page. Just putting in microsoft.com isn't enough for GP to understand that the link corresponds to a web page. Similarly, if a user enters mailto://user1@gmail.com in the E-mail field and clicks on the corresponding link the default e-mail client opens up ready to send an e-mail to me. If no prefix is used on an e-mail address, GP will respond with a "File Not Found" error when the link is clicked on. It's not smart enough to know that the @ symbol means that this is an e-mail account. Using a prefix in the Internet User Defined fields explicitly defines how this link should work and provides the most consistency to users.

Some Internet User Defined fields look special but aren't, and some really are special.

Login and password
By default Label 5 is set to Login and Label 6 is set to Password. These fields are supposed to represent the login and password for one of the associated web pages or FTP sites. However, these fields are not encrypted and there is limited security control. So, it may not be appropriate to leave these fields named Login and Password if a company doesn't want users entering that information here.

Labels 7 and 8
Label 7and Label 8 in the Internet User Defined Setup window are special fields that allow a user to look up and attach links to files located on the computer or the network. Clicking on the label name on the left opens the associatedfile. Any of the user defined fields can hold a filename, not just text. However, the special ability of labels 7 and 8 to allow users to look up filenames means that administrators should reserve these fields for file attachments.

Widening Segments width for better visibility in Microsoft Dynamics GP

When companies use alphanumeric characters in their chart of accounts wide letters, such as M or W, are often cut off. Horizontal scroll arrows don't help because the problem is that the segment field is too narrow, not the entire account field. To resolve this problem Dynamics GP provides an option to widen the segment fields as well.

On the Navigation Pane click on Administration, select Account Format. For each segment that needs to be wider, select the field under the Display Width column and change it from Standard to Expansion 1, Expansion 2, or Expansion 3 to widen the field. Expansion 3 represents the widest option.

Companies using only numbers in their chart of accounts won't need to widen the segment field. However, firms that include letters as part of their chart will need to increase the width. Following is a list of the expansion options and the letters these are designed to accommodate:
  • Expansion 1: A,B,E,K,P,S,V,X, and Y
  • Expansion 2: C,D,G,H,M,N,O, Q,R, and U
  • Expansion 3: W

Activating Horizontal Scroll Arrows for all users in Microsoft Dynamics GP

Horizontal Scroll Arrows are activated by the user. However, an administrator can turn this feature on for all users in all companies by running the following SQL script against the Dynamics database:

UpDate SY01400 Set HSCRLARW=1

Speeding Up Account Entry with Account Aliases in Microsoft Dynamics GP

As organizations grow the chart of accounts tends to grow larger and more complex as well.   Companies want to segment their business by departments, locations, or divisions. All of this means that more and more accounts get added to the chart. As the chart of accounts grows it gets more difficult to select the right account. Dynamics GP provides the Account Alias feature as a way to quickly select the right account. The account aliases provide a way to create shortcuts to specific accounts. This can dramatically speed up the process of selecting the correct account. We'll look at how this works in this recipe.

Getting ready
Setting up Account Aliases requires a user with access to the Account Maintenance Window.

To get to this window:
  • Select Financial from the Navigation Pane on the left. In the Cards section of the Financial Area Page click on Accounts. This will open the Account Maintenance window.
  • Click on the lookup button (indicated by a magnifying glass) next to the Account field.
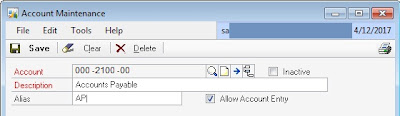
  • Find and select Account No.000-2100-00.
  • Enter AP in the Alias field, which is in the middle of the Account Maintenance window. This associates the letters AP with the Accounts Payable account selected.
  • This means that the user now only has to enter AP instead of the full account number
  • to use the Accounts Payable account:

  • Once aliases have been set up, let's see how the user can quickly select an account using the alias


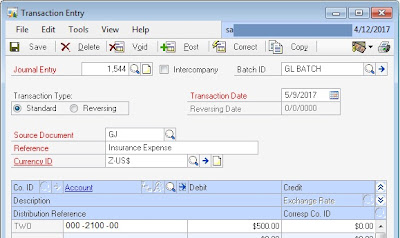
  • To demonstrate how this works, click on Financial from the Navigation Pane on the left. Select Transaction Entry from the Financial Area Page under Transactions.
  • In the Transaction Entry window select the top line in the grid area on the lower half of the window.
  • Click on the blue arrow next to the Account heading to open the Account Entry window.
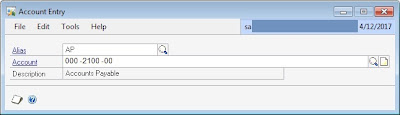
  • In the Alias field type AP and press Enter:

The Account Entry window will close and the account represented by the alias will appear in the Transaction Entry window:


Account Aliases provide quick shortcuts for account entry. Keeping them short and obvious makes them easy to use. Aliases are less useful if users have to think about them. Limiting them to the most commonly used accounts make these more useful. Most users don't mind occasionally looking up the odd account. However, they wouldn't want to memorize long account strings for regularly used account numbers.

It's counter-productive to put an alias on every account as that would make finding the right alias as difficult as finding the right account number. The setup process should be performed on the most commonly used accounts to provide easy access.

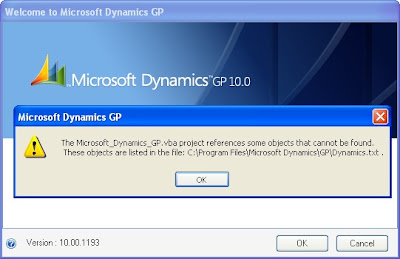
How To Remove/Avoid "Microsoft_Dynamics_GP.vba project reference" Message Box in Microsoft Dynamics GP

If you are getting "Microsoft_Dynamics_GP.vba project reference" Message Box at start-up then do the followings to ignore this.


Create DEXVBA.ini file, this file is not created by default. You will need to open Notepad (or similar text editor) and create it. The file should be created in the root Windows folder, not in the GP folder.

Step 1. Create a file named DEXVBA.ini in the root Windows folder.
Step 2. Add the following line to the top of the file: [General]
Step 3. Add the selected .ini setting beneath [General].

LogObjects=TRUE
This will create a text file that will include all of the objects in a VBA project. The text file will be the same name as the product dictionary with a ‘.txt’ extension.

NoUnresolvedDialog=TRUE
This will suppress the following error message when you launch Dynamics GP.
“The product_name.vba project references some objects that cannot be found.
These objects are listed in the file: C:\Program Files\Microsoft Business Solutions\GP\ product_name.txt”
The warning will be suppressed for all VBA projects loaded. It doesn’t solve the problem regarding missing objects, but it suppresses the message.

Contents of DEXVBA.ini

[General]
LogObjects=TRUE
NoUnresolvedDialog=TRUE

SAP R/3 Interface

As you learned in Lesson 1, "Accessing SAP R/3," when you launch SAP R/3, the SAP logon screen appears. Figure 2.1 shows the logon screen and points out the main elements of the user interface.

Plain English
User Interface


The controls and displays you use to operate something. In your car, for example, the user interface would consist of the steering wheel, the pedals, and the dashboard.

The title bar in this figure reads SAP R/3. This changes according to which screen you are looking at. The title bar also can help you confirm that you are where you need to be.

The menu bar contains a number of menus from which you select commands to perform your tasks. The available menus change depending on which screen you are in. Two selections available from all screens are System and Help.

Three standard Windows controls appear in the upper-right corner of the title bar:

  • The Window Minimize control minimizes the SAP R/3 window to a button on your taskbar (where it remains active and you can get to it easily). You can bring it back to full size by clicking it or by pressing Alt+Tab.


  • The Restore control changes your SAP R/3 session from occupying only a window on your screen to taking up the full screen. You might want to use this to check information in another system (to check your email, for example) while using SAP R/3. When your session is occupying only a window, the Restore control is replaced with a Maximize button, which you can click to make SAP R/3 take up the full window again.
  • The Close control (×) shuts down your SAP R/3 session, after you confirm that this is really what you want to do.
The tool buttons across the top of the screen function as shortcuts you can use to perform common tasks. SAP R/3 displays active tool buttons in color; shadowed tool buttons don't apply to the active screen.

Figure 2.1 shows a Quick Info box labeled New Password F5. (These are also known as ToolTips in Windows 95/98.) These boxes appear when you position the mouse pointer over a button. This one, in particular, indicates that you're pointing to the New Password button, which performs the same function as the F5 key—both open the New Password dialog box.

SAP R/3 uses fields to accept and display information. Some things to consider when dealing with fields include the following:
  • The length of a field shows you how many characters you can type in that field.
  • The cursor (a flashing line or block) shows the field you are now in (the active field); anything you type appears in this field.
  • SAP R/3 generally shows a field name for each field onscreen.
  • When SAP R/3 displays a question mark in a field, you must enter something into the field before you can go any further. In the logon screen shown in Figure 2.1, for example, a user name is required. If you try to go on without filling in all the required fields, SAP R/3 gives you an error message.

SAP R/3 and Dialog Boxes

Sometimes SAP R/3 uses dialog boxes to display or request information. When a dialog box appears, it becomes the active window, and its title bar is highlighted.
Plain English

Dialog Box  
A box that SAP R/3 displays to communicate with you. Dialog boxes are smaller than the full SAP R/3 window.

Figure 2.2 shows the Change Password dialog box. Notice that its title bar is highlighted, and the main screen's title bar is no longer highlighted to show that it's not active. This means that only the dialog box is active. You can't access anything on the main screen behind it until you deal with the dialog box. You must click Copy or × (Cancel) to close this dialog box and return to the main screen.


Sometimes SAP R/3 presents you with several layers of dialog boxes. You must deal with those boxes to get back to your original screen.

The SAP R/3 Toolbar

The SAP R/3 toolbar is the row of tool buttons across the top of the screen. Some buttons apply to all screens; others apply only to some screens. SAP R/3 tells you which are active by showing them in color. Shadowed tool buttons don't apply to the displayed screen. Table 2.1 shows you the tool buttons and describes each one.

TIP
Back and Exit  
New users sometimes find this confusing. If you are at the first screen in a series, the Back and Exit buttons will do the same thing. If you are at the third screen in a process, Back takes you back to the second screen, and Exit takes you right out of the process.

The Status Bar

The status bar is usually displayed at the bottom of the SAP R/3 screen (see Figure 2.3).


SAP R/3 uses the status bar to pass along information. In particular, the message area part of the status bar contains a message preceded by one of the following codes:


Code Meaning
I Information
W Warning
E Error
A Abnormal end

In Figure 2.3, the status bar message E: Required Entry not made is an error notice telling you that you need to fill in a field before you can proceed.

TIP

Status Bar Error Messages  
New users sometimes don't notice error messages on the status bar and don't know why they can't go on. The first thing you should look at when you have a problem is the status bar.

On the right end of the status bar, you'll find the following information:
  • Server name
    This is different from the one you typed in to gain access to the system, which may seem a little awkward at first. In Figure 2.3, the name is HRS(1)(000); HRS is the name of a demonstration system in the SAP Calgary office. We used the client code of 000 to access this system.
  • Session number
    You can have more than one SAP R/3 session open at once.
  • Insert/overtype indicator 
    This indicates which typing mode you are in. You switch between insert and overtype modes when you press the Insert key.
  • Clock
    SAP R/3 provides a clock in the lower right corner.
In this lesson, you learned the basics of the SAP R/3 user interface. In the next lesson, you see how to use the SAP R/3 screen elements to move between screens.

How to Kill Processes That Have Open Connection in a SQL Server

You may frequently need in especially development and test environments instead of the production environments to kill all the open connections to a specific database in order to process maintainance task over the SQL Server database.
In such situations when you need to kill or close all the active or open connections to the SQL Server database, you may manage this task by using the Microsoft SQL Server Management Studio or by running t-sql commands or codes. Actually, this task can be thought as a batch task to kill sql process running on a SQL Server.

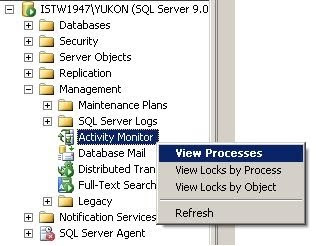
If you open the SQL Server Management Studio and connect to a SQL Server instance you will see the Activity Monitor object in the Object Explorer screen of the related database instance. You can double click the Activity Monitor object or right click to view the context menu and then select a desired item to display the activities to be monitored on the Activity Monitor screen.


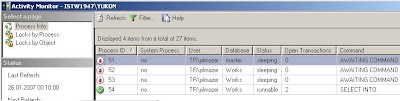
 As seen on below you can monitor and view process id's and process details on the list of prcesses running on the database instance. If you want you can filter processes based on specific values like user, database or status.

Note that default view when displayed the screen is first opened is filtered only for non-system processes which means system processes which own the first 50 reserved processid's are not listed in the view by default. You can view system processes by removing the filter on "Show System Processes" criteria in the filter settings screen.


 SQL Server 2005 SQL Server Management Studio Activity Monitor screen

You can kill a process by a right click on the process in the grid and selecting the Kill Process menu item. You will be asked for a confirmation to kill the related process and then will kill the open connection to the database over this process. This action is just like running to kill sql process t-sql command for a single process.

A second method which I do not recommend but can be used in some situations may be using the Detach Database screen to drop connections and detaching the database and then re-attaching the database.

By: http://www.kodyaz.com/

How To Find Out Who Entered a Transaction in Microsoft Dynamics GP

Short of purchasing and using the Audit Trails package, there is some information concerning the user that last worked on transactions in MS Dynamics GP.

Most of the transaction tables have a field for user ID. Typically, this is the last user to touch the record. If the transaction is posted, then the user that posted will have their id there, overwriting the ID of the person that entered the transaction.

The Sales Order Processing is different. There is a field called USER2ENT that records the ID of the user that entered the transaction and a field called PTDUSRID that shows the id of the user that posted the final invoice. This is in table SOP10100.

How To Void Partially Applied AP Payment in Microsoft Dynamics GP

When an AP payment has been partially applied, it cannot be voided in the normal manner. Here is what needs to be done:

1. Create a dummy invoice for the balance of the payment.
2. Apply the payment balance to the dummy invoice, fully applying the payment and fully paying the dummy invoice.
3. Use Void Historical to void the payment (reinstating the invoices that it paid) then void the dummy invoice.

How to Unlock a User in Microsoft Dynamics GP


This is useful in solving Dynamics GP error: "User is already logged-in" when you are trying to log into Dynamics version 7.5 and below.
For version 8 and above, a better way is to remove them in the User Activity window. Go to Setup - System - User Activity, then choose the user to delete.

SQL Command:

DELETE FROM ACTIVITY WHERE userid='username'

A quick way to duplicate or copy of PRICELEVEL SET in Microsoft Dynamics GP


Use this command to easily duplicate a pricelevel in GP DYNAMICS. You just need to specify the pricelevel code you want to copy, and the new pricelevelcode and its description. In the example below, 'RETAIL' is the code of the existing pricelevel. The script will copy that into a new pricelevel whose pricelevel code is 'WHOLESALE', and description as 'WHOLESALE CUSTOME PRICING'. Note: in the code, any text preceeded with a "--" is a comment.

SQL Command:

declare
  @source_pricelevelcode varchar(250),
  @new_pricelevelcode varchar(250),
  @new_priceleveldesc varchar(250)

SET @source_pricelevel = 'RETAIL'  -- SET YOUR SOURCE PRICELEVEL CODE
SET @new_pricelevel = 'WHOLESALE'  -- SET YOUR NEW PRICELEVEL CODE
SET @new_priceleveldesc = 'WHOLESALE CUSTOME PRICING' -- SET YOUR NEW PRICELEVEL DESCRIPTION


-- PROCEED TO COPY PRICELEVEL SET INTO ANOTHER, THERE ARE 3 TABLES INVOLVED

INSERT INTO iv00108(ITEMNMBR, CURNCYID, PRCLEVEL, UOFM, TOQTY, FROMQTY, UOMPRICE, QTYBSUOM)
SELECT ITEMNMBR, CURNCYID, @new_pricelevelcode, UOFM, TOQTY, FROMQTY, UOMPRICE, QTYBSUOM
FROM iv00108
where prclevel = @source_pricelevelcode

INSERT INTO iv00107 (ITEMNMBR, CURNCYID, PRCLEVEL, UOFM, RNDGAMNT, ROUNDHOW, ROUNDTO, UMSLSOPT, QTYBSUOM)
select ITEMNMBR, CURNCYID, @new_pricelevelcode, UOFM, RNDGAMNT, ROUNDHOW, ROUNDTO, UMSLSOPT, QTYBSUOM
from iv00107
where prclevel = @source_pricelevelcode

INSERT iv40800 (PRCLEVEL, DSCRIPTN)
VALUES (@new_pricelevelcode, @new_priceleveldesc)

How to remove the Customer Experience Improvement Program (CEIP) task from Microsoft Dynamics GP


The CEIP task appears after you install Microsoft Dynamics GP. CEIP collects information about how a customer uses Microsoft products and about any problems that customers experience.

SQL Command:

USE DYNAMICS
set nocount on
declare @Userid char(15)
declare cCEIP cursor for 
        select A.USERID
        from SY01400 A left join SY01402 B on A.USERID = B.USERID and B.syDefaultType = 48
        where B.USERID is null or B.SYUSERDFSTR not like '1:%'
open cCEIP
while 1 = 1
begin
    fetch next from cCEIP into @Userid
    if @@FETCH_STATUS <> 0 begin
        close cCEIP
        deallocate cCEIP
        break
    end

    if exists (select syDefaultType from DYNAMICS.dbo.SY01402 where USERID = @Userid and syDefaultType = 48)
    begin
        print 'adjusting ' + @Userid
        update DYNAMICS.dbo.SY01402
        set SYUSERDFSTR = '1:'
        where USERID = @Userid and syDefaultType = 48
    end
    else begin
        print 'adding ' + @Userid
        insert DYNAMICS.dbo.SY01402 ( USERID, syDefaultType, SYUSERDFSTR )
        values ( @Userid, 48 , '1:' )
    end
end /* while */
set nocount off

Find Field Value in Database in Microsoft SQL Server


The following is a SQL Script that can be run in a database to return all tables and columns where a particular value is present. This can be used for strings or values with a small modification.
This type of thing is great when moving applications/products between servers. This is certainly a good script to include in your master table to be used over and over.


SQL Command:

DECLARE @value VARCHAR(64)
DECLARE @sql VARCHAR(1024)
DECLARE @table VARCHAR(64)
DECLARE @column VARCHAR(64)

SET @value = 'valuehere'

CREATE TABLE #t (
    tablename VARCHAR(64),
    columnname VARCHAR(64)
)

DECLARE TABLES CURSOR
FOR

    SELECT o.name, c.name
    FROM syscolumns c
    INNER JOIN sysobjects o ON c.id = o.id
    WHERE o.type = 'U' AND c.xtype IN (167, 175, 231, 239)
    ORDER BY o.name, c.name

OPEN TABLES

FETCH NEXT FROM TABLES
INTO @table, @column

WHILE @@FETCH_STATUS = 0
BEGIN
    SET @sql = 'IF EXISTS(SELECT NULL FROM [' + @table + '] '
    --SET @sql = @sql + 'WHERE RTRIM(LTRIM([' + @column + '])) = ''' + @value + ''') '
    SET @sql = @sql + 'WHERE RTRIM(LTRIM([' + @column + '])) LIKE ''%' + @value + '%'') '
    SET @sql = @sql + 'INSERT INTO #t VALUES (''' + @table + ''', '''
    SET @sql = @sql + @column + ''')'

    EXEC(@sql)

    FETCH NEXT FROM TABLES
    INTO @table, @column
END

CLOSE TABLES
DEALLOCATE TABLES

SELECT *
FROM #t

DROP TABLE #t

Find any Column from any Table of any Database in Microsoft SQL Server


There may be some instance where in you need to know in how many table the column exist, this is useful query for the DBA to find the specified Column in a given database.

SQL Command:

SELECT name as Table_Name,
case when xtype = 'U' then 'Table'
      else 'View'
      end Type
FROM sysobjects WHERE id IN ( SELECT id FROM syscolumns WHERE name = 'ITEMNMBR')
and xtype = 'U'
order by name

Find Table Size of the Database in Microsoft SQL Server

Very useful script for DBA to know the each table size of a specified database.

SQL Command: 

DECLARE
@id int,
@pages int,
@objname varchar(750)

SET NOCOUNT ON

CREATE TABLE #tblSize
(
Name varchar (100),
Rows varchar (100),
Reserved varchar (100),
Data varchar (100),
Index_Size varchar (100),
Unused varchar (100)
)

CREATE TABLE #spt_space
(
rows int null,
reserved dec(15) null,
data dec(15) null,
indexp dec(15) null,
unused dec(15) null
)

-- declare main cursor to get first user table name from sysobjects
DECLARE TabNameCur CURSOR FOR
SELECT id, name
FROM dbo.sysobjects
WHERE xtype = 'u'
ORDER BY name


OPEN TabNameCur
FETCH TabNameCur INTO @id, @objname

WHILE @@FETCH_STATUS = 0
BEGIN

TRUNCATE TABLE #spt_space

INSERT INTO #spt_space (reserved)
SELECT sum(reserved)
FROM sysindexes
WHERE indid in (0, 1, 255)
AND id = @id

SELECT @pages = sum(dpages)
FROM sysindexes
WHERE indid < 2
AND id = @id

SELECT @pages = @pages + isnull(sum(used), 0)
FROM sysindexes
WHERE indid = 255
AND id = @id

UPDATE #spt_space
SET data = @pages

UPDATE #spt_space
SET indexp = (SELECT sum(used)
FROM sysindexes
WHERE indid in (0, 1, 255)
AND id = @id) - data

UPDATE #spt_space
SET unused = reserved
- (SELECT sum(used)
FROM sysindexes
WHERE indid in (0, 1, 255)
AND id = @id)

UPDATE #spt_space
SET rows = i.rows
FROM sysindexes i
WHERE i.indid < 2
AND i.id = @id

--This step required as 'convert.../1000' cannot be used with varchars
INSERT INTO #tblSize
SELECT name = object_name(@id),
rows, --= convert(char(11), rows),
reserved = convert(decimal (8,2), (reserved * d.low / 1024.)/1000),
data = convert(decimal (8,2), (data * d.low / 1024.)/1000),
index_size = convert(decimal (8,2), (indexp * d.low / 1024.)/1000),
unused = convert(decimal (8,2), (unused * d.low / 1024.)/1000)
FROM #spt_space, master.dbo.spt_values d
WHERE d.number = 1
AND d.type = 'E'

FETCH NEXT FROM TabNameCur INTO @id, @objname
END

-- close & deallocate main cursor
CLOSE TabNameCur
DEALLOCATE TabNameCur


SELECT Name, Rows,
Reserved + ' MB' as Reserved,
Data + ' MB' as Data,
index_size + ' MB' as Index_Size,
unused + ' MB' as Unused
FROM #tblSize

How To Reset System Password in Microsoft Dynamics GP

The GP Administrator probably forget the system password, here is a hidden technique to resetting password. When the user set a system password, it saved in DYNAMICS..SY02400, it is not recommended to remove or reinsert any record in this table, the following script will reset system password and user can redefine password.

SQL Command:

UPDATE DYNAMICS..SY02400 SET DMYPWDID=1,PASSWORD=0x00202020202020202020202020202020

How to remove "Report yields no data" message in Microsoft FRx

Removal of "Report yeilds no data" from any report or view report with complete zero balance, do the following steps:
  1. In column layout, insert new column as "CALC".
  2. In "Calc Formula:" type any figure i.e "2000+1000".
  3. In "Print Control" define "NP"
After done all changes in column layout, generate report.  All zero balance accounts will be appeared in report.

NOTE: Make sure "Display rows with no amounts" must be checked under "Catalog>Report Options>Formating" tab.

How to print "-" for Zero Amounts or assign "Dr" / "Cr" for Amounts in Microsoft FRx

In the Column Layout, there is a drop down containing default formats to select from in the Special Format Mask field. These can be modified as necessary.  Amount formatting has three separate sections separated by semi-colons.

#,##0.00; (#,##0.00); 0.00
Change the display of zero amounts to print either a line "-" or the text Zero, within the Column Layout select the Special Format Mask field for the column desired.  Use either the drop down to select a pre-defined positive or negative number format or use the edit bar from the top and type in the positive or negative number format.  Finally, type a semicolon and then type "-" if dash are desired, if word Zero are desired then type "Zero". Repeat steps for each column in the layout requiring the special format.
Ex:
For "-" type the following mask:
                 #,##0.00; (#,##0.00); -
For "Zero" type the following mask:
                 #,##0.00; (#,##0.00); Zero

NOTE:
If you desire to suppress printing of amounts, enter semicolons with nothing between them. The missing format prevents that type of amount from being displayed. Ex. #,##0.00;;Zero

NOTE:
If you desire DR next to positive amounts and CR to print next to negative amounts, you can do so by placing these in quotes anywhere in the format. Ex. #,##0.00DR; #,##0.00CR; Zero As in this example, there is no need for the parentheses for the negative amounts.

Simplify Account Reconciliation with SmartList Builder

While it might not be the first use that comes to mind, you can use SmartList Builder to more easily reconcile payables to the general ledger in Microsoft Dynamics GP.
To find out how, follow this guide from John Ellis, a consultant at Tribridge, a Microsoft Gold Certified consulting firm.  This SmartList displays the Payables Batch ID as a column alongside the General Ledger Journal Entry column. According to Ellis, you access Microsoft Dynamics GP SmartList Builder in Tools > SmartList Builder > SmartList Builder, and take the following steps:

1. Click the plus sign (+) next to Tables.
2. Choose Microsoft Dynamics GP Table.
3. Choose Microsoft Dynamics GP for Product.
4. Choose Financial for Series.
5. Choose Year-To-Date Transaction Open for Table.
6. Click Save.
7. Click the plus sign (+) next to Tables.
8. Choose Microsoft Dynamics GP Table.
9. Choose Microsoft Dynamics GP for Product.
10. Choose Financial for Series.
11. Choose Account Index Master for Table.
12. Choose Year-To-Date Transaction Open for Link To Table.
13. Choose Equals for Link Method.
14. Click the plus sign (+) next to Link Fields.
15. Choose Account Index in the From and To fields.
16. Click Save.
17. Highlight Year-to-Date Transaction Open.
18. Click the plus sign (+) next to Tables.
19. Choose Microsoft Dynamics GP Table.
20. Choose Microsoft Dynamics GP for Product.
21. Choose Purchasing for Series.
22. Choose PM Transaction Open File for Table.
23. Choose Year-to-Date Transaction Open for Link To Table.
24. Choose Left Outer for Link Method.
25. Click the plus sign (+) next to Link Fields.
26. Choose Originating Master ID in the From field.
27. Choose Vendor ID in the To field.
28. Click Save.
29. Click the plus sign (+) next to Link Fields.
30. Choose TRX Date in the From field.
31. Choose Posting Date in the To field.
32. Click Save.
33. Click the plus sign (+) next to Link Fields.
34. Choose Originating Control Number in the From field.
35. Choose Voucher Number in the To field.
36. Click Save.

Create a restriction in Microsoft Dynamics GP SmartList Builder to only pull in the PMTRX source document, limiting to transactions posted from Payables Transaction Entry and not from other modules. To do so, follow these steps:

1. Click the Restrictions button.
2. Click the plus sign (+) next to Restrictions.
3. Choose Year-to-Date Transaction Open for Table.
4. Choose Source Document for Field.
5. Choose Is Equal to One of List for Restriction.
6. Enter GJ for Value.
7. Click Add.
8. Enter PMTRX for Value.
9. Click Add.
10. Enter CMTRX for Value.
11. Click Add.
12. Click Save.
13. Click OK.

Create a calculated field that will display a column indicating if the batch in the SmartList was created as a result of posting a transaction in Bank Reconciliation. Do so as follows:

1. Click the Calculations button.
2. Hit the plus sign (+) next to Calculated Fields.
3. Enter Bank Rec Batch for Field Name.
4. Choose String for Field Type.
5. Type the following formula in the Calculation field:
    CASE {Year-to-Date Transaction Open:Source Document} WHEN 'CMTRX'
       THEN 'Bank Rec'
       ELSE 'Not Bank Rec'
    END
6. Click Save.
7. Click OK.

If your client does not pay its posted payables transactions within a regular monthly cycle, these transactions will reside in the PM Transaction OPEN File table. So, instead of using the PM Paid Transactions File table, you would use the PM Transaction OPEN File table.